Pro Controller Spec Sheet
Find out a little more about the brains behind your solar pumping system, Pro Controller.
Having Issues? Start Here!
The most common support calls we receive about the Pro Irrigation Surface Pump are about solar panel wiring, pump wiring, priming the pump and setting up a pressure shut off/float. If the Pro Keyboard is flashing a fault code, scroll down below to check out fault troubleshooting based on the version of controller. Check through the following information, and maybe you’ll be able to quickly self-diagnose the issue.
Priming
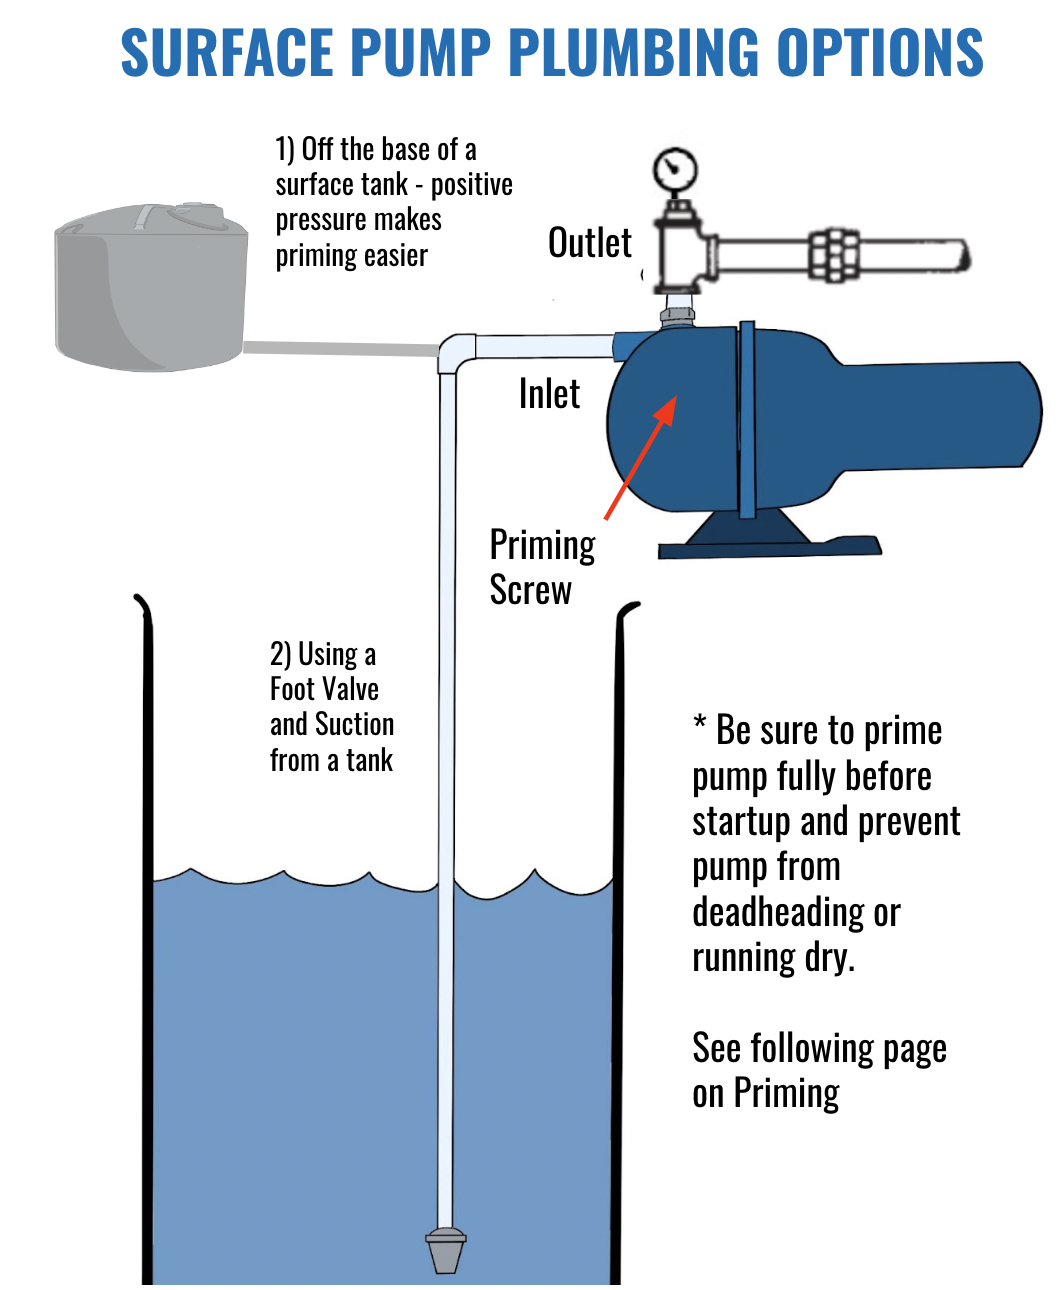
Suction: The Pro Irrigation Surface Pump Once pump is initially primed, filled with water, it will re-prime when the water level rises above the end of the suction pipe. Install an airtight union in the suction line close to the pump. Installation of a foot valve at liquid source is recommended. For installation with long suction piping, both a foot valve and a check valve are recommended. To avoid air pockets, no part of the piping should be above the pump suction connection and piping should slope upward from liquid source. For installations with long suction piping, fill the suction pipe with water before connecting to pump. Install a tee at the discharge connection of the pump.
Discharge: The top opening of the tee is required for initial priming. See Figure 1. 
Piping: Pump MUST be installed horizontally on a solid flat surface, with discharge on top.
• Allow adequate space for servicing and ventilation. Protect the unit from weather and water damage due to rain or flooding or freezing temperatures.
• Piping should be no smaller than the suction and discharge connections and kept short as possible, avoiding unnecessary fittings to minimize friction losses.
• All piping MUST be independently supported and MUST NOT place any piping loads on the pump. NOTICE: DO NOT FORCE PIPING INTO PLACE AT PUMP SUCTION AND DISCHARGE CONNECTIONS.
• All pipe joints MUST be airtight.
• The use of TeflonTM tape, or equivalent, is recommended for ALL pipe joints.

Pump Wiring
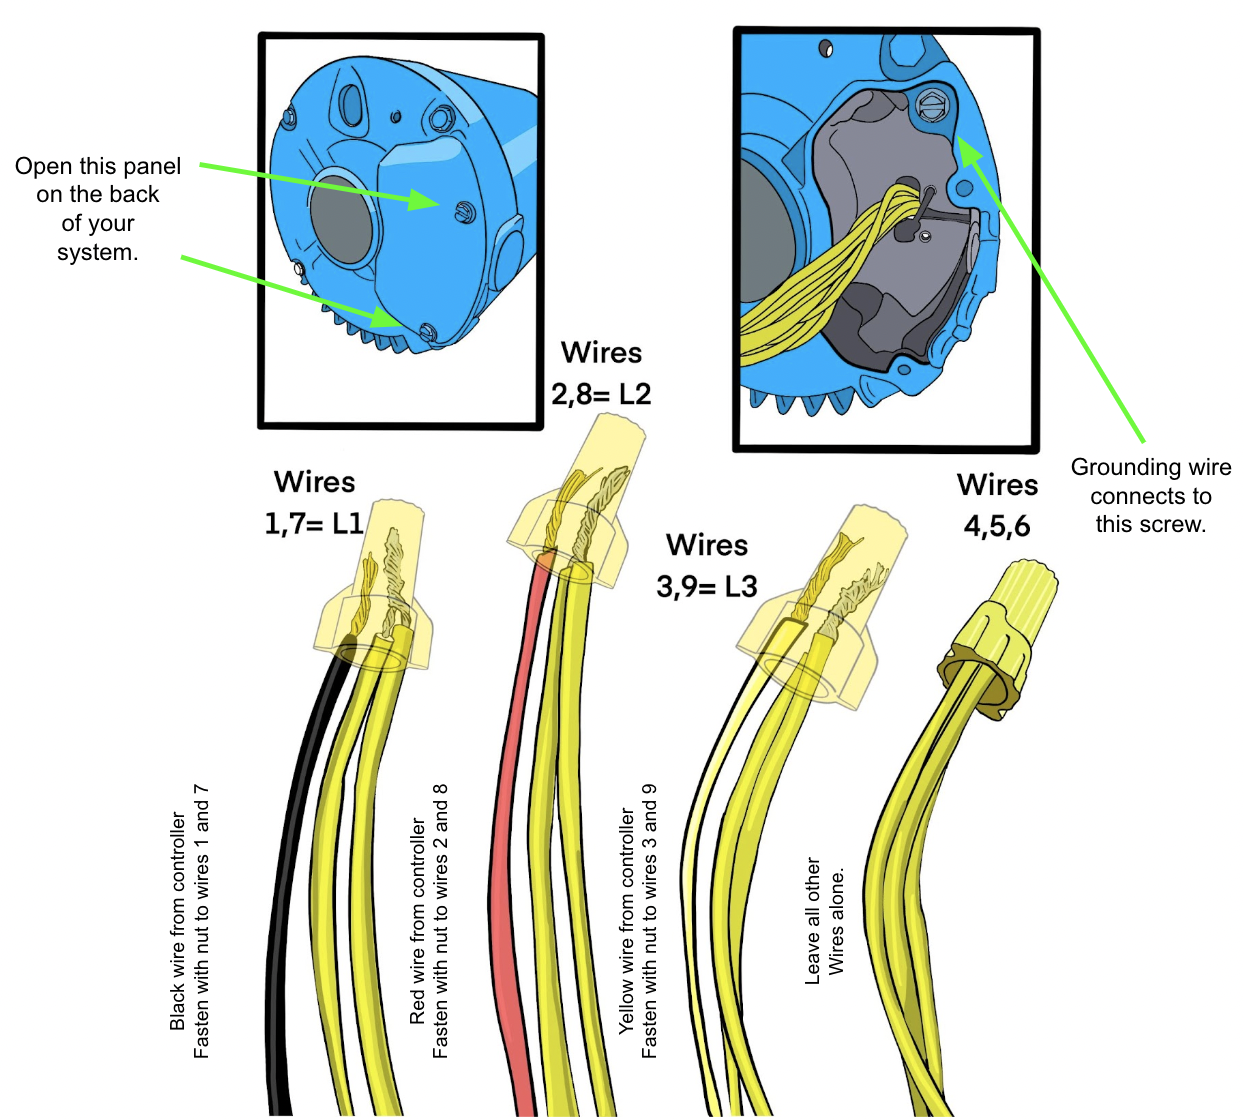
Ensure the pump wire uses 4 strands total (three hots + one ground). Occasionally, customers will swap hot wires with ground wires, this will trigger an SPO fault with low or no water output. Swap around the pump wires to check if volume improves.
Solar Panel Wiring
Panels for the Pro500, 750, 1000, 1500, 2000 and 3000 are connected in series(panels can be oriented in different patterns for mounting purposes though). Series wiring can be explained in a variety of ways including “positive (+) to negative (-)”, “male to female”, “daisy chain” or even our engineers favorite, “all your panels are holding hands”.
The positive (+) and negative (-) wires from your solar array will come into the DC Cut-off switch from the top. The short MC4 jumper wires included in your kit will connect at the bottom of the DC cut-off switch. All connections will be prepared before making the final connection to the DC inputs on the bottom of the solar pump controller. Mount your solar panels away from all possible shade, facing south at the proper tilt angle for your latitude.
Purchasing Wire

The type of pipe used for dropping a pump into a well depends on the drop depth, a deeper drop depth requires stronger, thicker walled pipe. Flow rate produced by the pump also influences the pipe diameter, ask our engineers if you are unsure what type and diameter pipe to use.


Your Pro Controller will monitor pump operation and shut the pump off before it can run dry. The controller is constantly monitoring the mix of amperage and voltage sent to the pump, and a sharp increase in amperage will alert the controller to a possible run-dry scenario, leading to pump shut-off.
Why A Reverse Action Pressure Switch Instead of a Regular Pressure Switch?
Reverse Action Pressure Switch
Getting the reverse action pressure switch properly dialed in can be a bit tricky with the Pro Irrigation Surface Pump, the pump has a very tight pressure band to make adjustments. For irrigation setups with multiple different PSI and flow needs, like 5 GPM/20PSI for drip in one zone and 20 GPM/45PSI for sprinklers in another zone, our engineers suggest switching to a centralized valve to run the drip and sprinklers at the same time. For example, setting the reverse action pressure switch to a typical 50/30 shut on/shut off runs sprinklers as normal, but won’t shut down the pump once the drip line section closes, leading to dead head. The reverse action pressure switch may also encounter problems when one type of irrigation (like impact sprinklers for 20 minutes) run for shorter amounts of time than the other type (drip lines for 8 hours),
Multiple zones of the same flow rate are fine, otherwise trying to switch between sensitivities which is GPM basically equals pressure for this pump.
Our controller logic for tank full relies on a reverse action pressure switch.
With a normal action pressure switch, when pressure is low a normal action pressure switches the contacts closed. When pressure is reached the contacts close.
Reverse action are reverse, when pressure is low the contacts are open. When pressure is reached the contacts close. When the contacts close the pump turns off.
Upon activation, your controller allows you to switch between solar power and 220v AC (Generator or Grid) automatically. You’ll be plugging into the AC Input Port on the bottom of your controller. You are going to wire out the Neutral and connect two hots (L1 and L2) to the L and N terminals in the 3 prong plug supplied in your kit.
Video Explanation Coming Soon!
Pro 500, 750, 1000, 1500, 2000, 3000
You’ll be connecting + wires to – wires in ‘series’ (panels can be oriented in different patterns for mounting purposes though).The positive (+) and negative (-) wires from your solar array will come into the DC Cut-off switch from the top. The short MC4 jumper wires included in your kit will connect at the bottom of the DC cut-off switch. All connections will be prepared before making the final connection to the DC inputs on the bottom of the solar pump controller. Mount your solar panels away from all possible shade, facing south at the proper tilt angle for your latitude.


Pro 5000, 5000V6, 5000V8, Pro Lakemaker XL

If you plan pumping into a tank and want the pump to shut off once the tank has filled, you’ll need an external shut off like a float switch or a mechanical float valve connected to a reverse action pressure switch. These floats will send a signal to the controller telling the pump to shut off once the tank is full, and another signal telling the pump to turn on if the tank is emptying.
With that being said, you could potentially swap out the current pump with a higher powered pump and keep the same controller. A higher horsepower pump would require more panels as well.
Indicator Lights

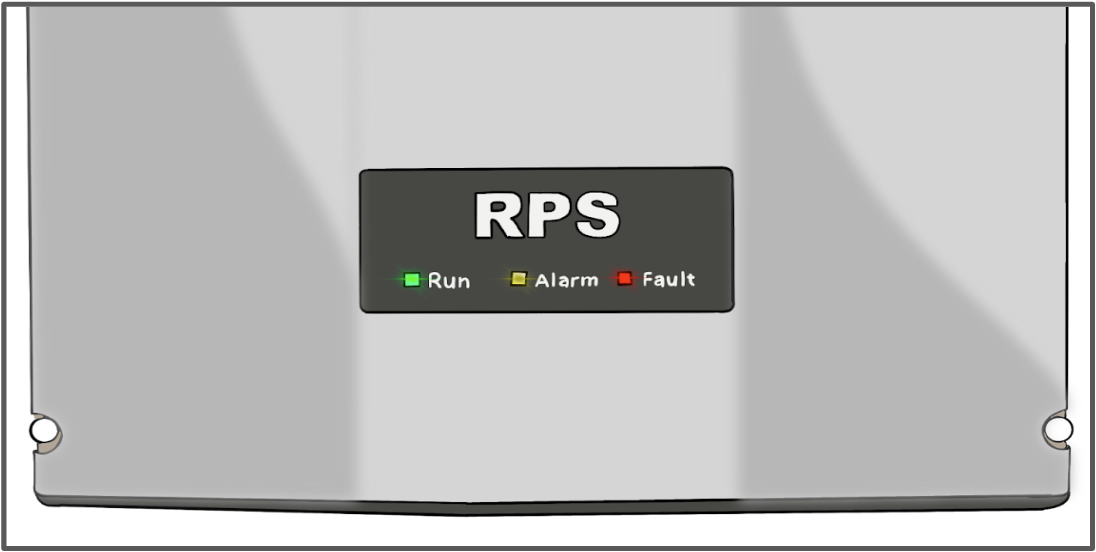
RUN – GREEN LED
- STEADY GREEN light means the pump motor is running normally between the minimum and maximum frequency.
BLINKING GREEN light means that your system is in startup mode.
ALARM – AMBER LED – This is a normal stop condition. When the ALARM light is illuminated an external condition is sending a signal to the controller to stop pumping water. Pumping will only resume when the external condition is resolved. The most common conditions causing a stop condition are:
- The tank is full.
- There is insufficient light to run your system.
- There is not enough water in the well (sucking air) and pump is waiting on a preprogrammed time delay before it can resume.
FAULT – RED LED
- If the FAULT light is illuminated it means a fault condition has occurred within the controller. Usually this indicates there is insufficient power to the controller to power up the pump (check that your solar panels are in full sun with zero shade. Even a small shadow can have significant impacts to water production).
- It can also indicate a system or programming fault that will place the controller in Standby to protect it. A fault condition can be temporary and may require resetting the controller by cutting system power with the DC disconnect, waiting 60 seconds (no lights on!) and then powering back on to resolve the fault.
- If the fault occurs repeatedly you will need to connect your Keypad to the controller to read out the fault condition displayed on the red seven segment LED on the keypad. RPS Support Engineers can help troubleshoot in cases of repeated faults.
