Solar Water Pump Full Installation & Demo • RPS Solar Pumps
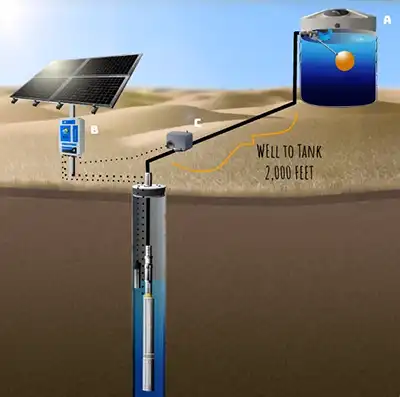
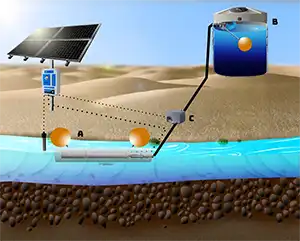
This is Mike with RPS Solar Pumps and today we have an exciting video for you; that’s a complete installation of one of our solar pump kits. You can see all the components here behind me. They easily fit in the back of a truck, so you can drive up to your installation site and get on installing. Here, we have our pump, we have our solar panels, and we have our Turnkey Kit. Now we have a complete video about the Turnkey Kit, but it comes with our solar panel mount, our pipe, our wire, and basically everything else you’re going to need for the installation. All you need to supply is the mounting pipe for the panels, concrete to mount that pipe, and a grounding rod.
You also get our complete 36-page instruction manual outlining this complete installation process. We’re going to be referencing this today as we go along, but if you need to out it in the field, you have this as a great resource in order to install and troubleshoot if you need to do any troubleshooting along the way. Let’s go ahead, unbox some of this, and I’ll go over some of the major components coming with this system. One of the greatest things about this system is it shipped right to your door in around three to five days, so you don’t have to wait a long time in order to start your installation.
Here, we have our solar pump box. It has our pump, controller, and some of our accessories in it. Let’s go ahead and take a look at what you’re getting in this box. First thing we have is our 36-page color user manual. Here’s our submersible pump with bubble wrap for shipping. This is our three-inch helical style. We also have other three-inch centrifugal, and if you’re going with our Pro Series, we’re gonna have a much larger four-inch diameter pump. Our controller, which takes the solar power and drives the pumps, located in here. We have our 20 feet of solar wire to connect from the solar panels up to our controller. You’re gonna get two sensors with a hundred feet of wire on each. One is our low well sensor. The other is our tank full sensor. Good thing is they’re identical, and they’re gonna perform a function to hook up to the controller, and it’s either going to turn the system on or off depending whether it’s the tank full sensor or the well low sensor which happens to protect the pump. Stainless steel hose barb along with our hose clamps. This comes in three quarter inch standard, but if you need to do one inch poly pipe, we can swap it out for a one inch barb. We have a splice kit. Our splice kit is going to waterproof our connections. When we connect our pump, which has around eight feet of wire, up to our drop wire, which is contained in our Turnkey Kit.
This makes a nice waterproof connection, and it’s adhesive-lined, so as we heat it — and you’ll see this later — the adhesive is going to flow out of the shrink tubing and it’s going to seal up that splice connection. We have our spare pumping mechanism. If you’re getting a helical pump, there is a spare pumping mechanism. This pump is one of the only pumps that’s field-repairable. In case you ever wear it out due to a degraded well — like you’re pumping sand or silt or just after a long number of years of pumping — you may need to replace this pumping mechanism. You get a free one, and we have a lifetime warranty on this. If you’re using one of our centrifugal pumps, there are no wear parts. You’re not going to need this. We also have adhesive-lined shrink tubing and crimps if you need to extend out either your tank full sensor or your well-low sensor. That’s a signal wire. We can use any gauge we need in order to extend it. A majority of the installations are going to be fine with the 100 foot of wire included in the kit. We also have our mounting screws and our ground lug. This goes in the back of the controller. We’ll show you that during the installation, how to hook this up.
Back behind me we have our solar panels and our mount. The solar panels come shipped two per box. They’re facing glass-to-glass. When you get these, you’re going to want to inspect them. Make sure there’s no shipping damage. This contains all of the aluminum parts you’re going to need in order to mount our panels on either our two-inch inside diameter post for our two panel mount or our four-inch inside diameter post for our four panel and our eight panel mount. We’re gonna open this up when we do the installation a little bit later. Our base solar pump kits come with the pump, controllers, accessories, and our solar panels.
We want to provide our customers the most flexibility to decide whether they want to build; such as building their own mount, or whether they just want to purchase the rest of the components. If you want to purchase the rest of the components, I highly recommend our Turnkey Kit that comes with the solar panel mount and the bundle you see here, which comes with our poly pipe on the outside, and then inside it’s going to come with our wire, our drop rope, and a couple other accessories like well seals and the through fittings for those; basically, everything you’re going to need to install your pump besides the mounting pipe, the concrete, and the ground rod.
Let’s go ahead, cut this open, and I’ll show you what’s coming in the Turnkey Kit. So let’s go ahead, get the box pulled out, and we’ll show you what comes in the inner box of the Turnkey Kit, surrounded by our poly pipe. The Turnkey Kits come in 100-foot, 200-foot, and 300-foot lengths. They’re all pre-packaged like this, ready to ship to your door. In this case it’s a 100-foot Turnkey Kit, so on the outside here we have a hundred foot of poly pipe. In this case, we’re using a one-inch but we also have it in three quarter inch. Depending on your flow rates, we’ll help you size whether you need to get a three quarter inch or one inch kit. And then here is our hundred foot of submersible pump wire. This is high-quality pump wire, dual jacketed. It has an outside PVC jacket and an inside PVC jacket on each of the conductors to provide abrasion resistance so you’re not going to get any shorts in your well.
We have 100 foot of safety rope. We do recommend installing safety rope in case we have an issue with our poly pipe, it’s going to give us something else to pull the pump out. In this bag, we have our ground clamp — which is going to go on a ground rod — our ground wire, we have teflon tape that’s going to provide nice waterproof connections as we do all the plumbing. And electrical tape. We’re going to use electrical tape quite a bit as we’re dropping the pipe down. I’ll show you how we’re going to do that in a little bit. We also have our one inch barb. As I said, the kit comes standard with a three quarter inch barb. Since we purchased a one-inch turnkey kit, we’re going to get a separate one-inch barb in order to do this installation.
We also have our through fittings for our well seal. Now the well seal comes in multiple sizes. You’re going to need to let us know whether you’re going to need a four-inch, five- inch,six-inch — whatever matches your casing. We have a whole video on how to measure casing size, so check that out if you want to know what size casing you have. These are all stainless steel fittings. They’re great corrosion resistant, so when we put this through the well seal, the pump is going to hang off the bottom here. And then we’re going to have a one-inch outlet. From this one-inch outlet, you’re able to hook up whatever plumbing, whether you’re going into a tank your house or whether you’re going to free flow into a pond. If you ordered a 200-foot or a 300-foot Turnkey Kit, you’re going to have a different low water sensor in your Turnkey Kit. It’s going to have either 200 feet or 300 feet of wire in order to match your installation depth. This makes it super easy so you don’t have to splice any of this wire. So that’s the basis of the kit and everything you’re going to need to do the installation.
Let’s jump in the truck. We’re going to drive on over to the well and let’s get started installing. So we’re out here on our well site. Let’s go over the tools you’re going to need for the installation. Along with some site work you could do ahead of time to make install day go much smoother, we brought our toolbox. First of all, you’re going to need a set of wrenches or an adjustable wrench. This is going to be for all of the bolts on doing our solar panel mount. A pair of electrical pliers are going to come in really handy today. These are multi-feature; we’re going to be able to strip the wires, we’re going to do our crimping, and if we have any fine electrical work, we’ll be able to grab wires and get them hooked up where they need to go.
We’ll need a screwdriver. A pipe cutter comes in handy for cutting all of our poly pipe. You can also use a pocket knife, but a pipe cutter is going to make it a little bit easier. We’re also going to need a torch or a hot air gun or a lighter. This is going to be for our adhesive-lined shrink tubing. We’re going to heat it up so it shrinks down on the wire and also melts that adhesive so we have a nice waterproof connection. If you have a multimeter, it’s going to be best to bring it out. While you’re not going to need it for a standard installation, if you run into any troubleshooting it’s going to make it much easier so you can determine where the power is going and where your problem lies with your setup.
Finally a shovel. This is going to be used for digging the hole for our post in order to mount our mounting pipe. If you have a sledgehammer you might as well bring that along. It’s going to make it much easier for putting in your grounding rod. So as you can see, it’s not too many tools needed. Better to bring more than less so you don’t have to run back to the shop and grab anything you forgot. Now let’s go quick over site planning. So we’re out here on our well site. We picked a nice sunny area. Now the sun is going to come in from the south, which in our case is this direction. So while we do have trees behind us, those trees are not going to affect us because they’re not located to the south. So we’re going to want to mount our pipe for our solar panels in a nice sunny location. We don’t want any small shadows, we don’t want any tree branches — anything hanging over it that’s going to obstruct the panels. We have a whole video about shadows and how they affect the power output of your panels. You might not believe it, but even a small shadow can cause a significant power drop, and that is going to affect your water output.
So if you have a bunch of big trees, time to get out the chainsaw, fire it up, and cut some limbs. So we have nice clean sun to make the installation day go much smoother. It’s going to be nice if you can come out the day before and get your solar panel pipe mounted into the ground. You’re going to want to dig around a 30-inch deep hole and use at least three bags of concrete for your solar panel mounting post. You see this one here might look a little strange; this is actually our portable mount. We move it around to all of our different test setups. You’re going to want to mount yours permanently in the ground, so it’s going to look a little bit different. We’re gonna break this installation into four simple steps:
Step 1: We’re gonna do the splicing of the drop wire and the plumbing connections to our solar pump.
Step 2: We’re gonna mount our solar panels onto our post.
Step 3: We’re gonna wire up our controller.
Step 4: We’re gonna turn on the system, see how it runs, and do some testing to make sure everything’s operating correctly.
Let’s jump in. I’m gonna show you how to do the plumbing connections and the splice to your submersible pump.
Step 1 – Pump and Plumbing Installation
So first thing we’re going to do is we’re going to take our poly pipe out of the blue packaging. We’re also going to get our drop wire out and we’re going to extend it on this field. Part of that is going to allow the pipe to heat up. The pipe’s a little bit easier to handle when it’s warmed by the sun. If you don’t have a sunny day, that’s all right. You can still handle it while it’s rigid, but if we get it laid out it’s gonna help get some of the coils out of there, get it straighter –much easier to drop down our well casing. So let me go ahead, I’m gonna get this laid out. Once I have it laid out, we’re gonna jump back over here. I’m gonna pull out the submersible pump. We’re gonna do our splice and our plumbing connections to that pump. So we got our drop pipe and our drop wire laid out along over there. It’s nice: the sun’s out.
It’s going to heat up that drop pipe, and it’s going to make it easier to work with when we’re dropping it down the well casing. Now we’re going to get our pump ready. It’s real nice: the pump has three wires coming off of it and it comes with crimps already attached to it. So you’re just going to have to crimp this to your drop wire. It also comes with adhesive- lined shrink tubing. Before we do the crimping we’re going to slide the shrink tubes over, perform our crimps, slide them over our crimps, and then using a small torch, we’re going to heat them up, let them shrink down that inside adhesive. It’s a kind of like a hot melt glue; it’s going to melt, it’s going to ooze out the ends and it’s going to make a nice waterproof connection.
Now there are wire numbers on each of these: one, two, and three. When we do this crimping, if your drop wire colors don’t match up exactly, you’re going to want to write in your instruction book the pump wire to your drop wire color code. In your splice kit, we also include new numbers: one, two, three. So when you make these connections, go walk to the end of your drop wire and put the markers on. I can’t tell you how many times people have done this: they think they can remember but they’re not quite sure when they’re sitting at the pump which one is one, two, three. Well it’s not the end of the world. At that point, it’s going to take some troubleshooting, and you might have to pull your pump up to figure it out. So it’s best, while you do this connection, write it down. Take a picture with your phone or put your markers on your drop wire so you remember when it’s time to hook up your controller which wire is one, which wire’s two, and which wire’s three.
I’m gonna do this splicing process fairly quickly, but we have another YouTube video with a detailed step-by-step of how to do the wire splice. If you want a little bit more instruction, go ahead, check out that video. It’s going to walk you through it. You’re going to see all the steps here, but i’m going to go fairly quickly in order to get this splice complete. So let’s now move on to doing our plumbing. The basics are: we’re going to take our barb, put it into the end of the pump, and attach our poly pipe. So for this installation, we’re not going to install a check valve at the outlet of our pump because due to freezing considerations. We want the line to drain back every night when the pump shuts off and the sun is down. If you’re doing a pressurized system or perhaps a really long run, you might want to install a check valve. Very straightforward; this simply screws into the end of your pump and your barb attaches to the end. We’re not gonna be installing this. We’re just gonna put the barb directly on the outlet of the pump. I’m gonna go ahead, I’m gonna do those steps, and we’ll check in when I’m all complete.
So you can see the plumbing was a very simple step. We used Teflon tape to seal our threads. A couple of wraps is fine. That’s going to help prevent any leaking out of that connection and make sure it’s nice and secure. So you’re going to notice at the very end, we used electrical tape and we wrapped up our clamps that hold the pipe to the barb. Now that’s an important step; when we later tape this wire up above, we don’t want the wire rubbing against the sharp edges of the hose clamps causing a short or cut in our wires. It’s going to provide some nice protection for the wire so you don’t run into any issues over the years of operation.
So at this point you have two options: one is we can go ahead and drop our pump down our well without our solar panels set up, but we always recommend testing in a bucket of water if you have it available. So in this case we’re going to mount our solar panels. We’re going to get our bucket of water, test our pump with the controller, and solar panels hooked up. Then the final step is going to be dropping it down our well. That way if we have any issues with our splice, or say we forgot to label our wires, it’s going to be very easy to troubleshoot that at the surface, make sure we’re pumping water, then we drop it down our well and then do a final water check.
Step 2 – Solar Panel Installation
So I’ve gone ahead, I’ve unboxed the solar panels and now it’s time to install our mount. So as you can see, the mount kit is 100 percent stainless steel and anodized aluminum. That gives it the ultimate corrosion resistance for years out in harsh environments. It’s easy to bolt together. Doesn’t require any other tools than a wrench. We also have a detailed installation video for this mount. Again, I’m going to go through it rather quickly. You’re going to see all the steps go together, but if you have any questions there’s a nice color user manual that comes with all the mounts. Plus we have that detailed video that should help you get going and get you set up right away. So our solar panels are mounted on our Top-of-Pole Solar Panel Mount. I went ahead, pulled out a controller. And you’re going to see on the back of your controller there’s four screws, and if you purchased our Top-of-Pole Mount it’s going to come with these brackets and these clamps. And this is going to allow us to mount our controller onto our pole. Also in the bag of screws, there’s also a little ground clamp. We’re going to put this ground clamp also on the back of the controller, and that’s gonna allow us to hook up our ground wire. Let’s go ahead, get this controller mounted, and then we’ll start doing our initial wiring.
So we have our controller mounted onto our pole, and I went ahead and pulled off the door. It’s convenient, if you want, to put your door up on top of here. It’ll kind of sit in place while we do all the wiring. Now if you have a two-panel or a four-panel RPS System — that’s the RPS 200, RPS 400, and RPS 400v — we’re going to connect all the panels in series, and then using our solar extension wire, we’re going to connect the two ends down to our controller here. If you have an RPS 800 or 800v, this is a very important step. We don’t want to hook all eight of our panels in series. We want to hook four in series in one chain, then four in series in another chain.
Then inside your pump box are these Y-connectors. These Y-connectors allow us to hook the positive wires on one side together, and the negative wires on the other side together, putting the two sets of four panels in parallel. Then off of these Y-connectors, we can use our solar extension wire and come down and plug it into our controller. If you hook up more than four of our 100 watt panels in series, you’re very likely going to damage the controller. If you’re using your own large panels, then you want to be very careful. A lot of larger panels are higher voltage, in the 40 to 45 volt output range. That means on those panels, very likely you’re going to be able to put a maximum of two in series and then the rest of those are going to be in parallel. If you have any questions about it there’s large panel sizing in the user manual, or if you’re still unsure give us a call. Send us a picture of the data plate on the back of the panel and we’ll tell you how to configure the solar panels. There’s nothing worse than getting out of the field and burning up a controller and having to swap it out for a new one.
In this case, we have an RPS 400 with four panels. I’m gonna connect all the panels in series. I’m gonna grab our solar extension wire and run it down into our controller. I’m gonna hook most of it up. I’m not gonna hook this part up until we have our pump wires connected. Then I’ll do a final plug-in and we’ll do a test in our bucket. Let me go ahead and get that set up. So I went ahead and got everything set up and we’re ready for our bucket test. I have all four panels in series, and then I used our extension wire in order to bring the plus and minus up here, ready to go onto the controller. I also installed our ground rod and our ground wire. Our ground wire connects to the back of the controller, and I used a six foot ground rod in the back and the provided clamp in order to hook up the ground wire to the ground rod. If you’re in a high-lightning area, this is a very important step, because if you get direct strikes or nearby strikes it’s going to help protect your controller and your panels against that damage. I also hooked up our pump wire for this test. As you can see, I previously labeled the wires one, two, three. And they go into the corresponding spot — one, two, three — on the controller.
Step 3 – Controller Installation
Now I’m ready to plug in my controller and run the test. Now, we don’t have our low well sensor hooked up and so we are going to have to put a little jumper in here in order to override it. If you don’t have a little jumper you can go ahead hook your low well sensor in here and put it in the bucket in order to get the pump to run. Because we have low water protection, it is going to require either a small jumper across COM1 and WH, or that the sensor is submerged in the bucket.
Now when I do this test, I don’t want to run it too long. I either want to wait until I have water coming out of the end of the pipe, but if you have a long pipe, as long as you’re seeing the water level drop in the bucket, you know the pump wires are correct, and you have good connections, and that’s sufficient for your bucket test.
Step 4 – Testing and Finishing Up
So let me go ahead, I’m going to plug this in. I’m going to hook up my low water override and I’m going to fire it up and see if it’s running the right way. As you can see, our bucket test was successful. I highly recommend you do the bucket test before you drop the well pump down our well, because it’s much easier to troubleshoot anything here at the surface where we have access to the pump, we have access to the splice, and all of the wire. But if you’re unable to just double check your connections, then go ahead and drop it down in order to get ready for dropping our well pump down our well. I’m going to go ahead and attach our low well sensor. This is very important; it’s going to prevent our pump from running dry.
If we’re over-pumping our well, and it’s going to protect our pump and motor from overheating. It’s really easy to attach. We attach it around one foot above our drop pipe just using some electrical tape. Let me go hook this onto our drop pipe and then we’ll get ready to do our final installation. The great thing about our system is in addition to the low well sensor, we also have inputs for a tank full sensor. This can go into a tank, a horse trough, or wherever you’re pumping your water and when the water level rises up and touches the sensor, it’s going to tell the pump to turn off and that’s going to prevent your tank from overflowing. This is the exact same sensor as the low well and it’s stainless steel. That means there’s no moving parts to break over time. So we’re going to go ahead, we’re going to get this sensor installed on the top of our tank and then we’re going to do a final hookup to our controller. We’re going to hook up the pump wires the tank full wire and the low well wires using the glands on the bottom of our controller.
Let’s go ahead and get that set up. You can get more creative with your installation method, but literally we’re just going to take the sensor, put it through into the top of our tank, and let it hang by the wire. And that’s going to act as our tank full, and when it gets to around right here in the tank, it’s going to shut off the water automatically so we always keep a full tank.
So we’re ready to drop our well pump down our well, and there’s two ways we can do this. If you’re installing by yourself, I recommend we stretch out the drop pipe and you pre-tape the wire and the low well sensor every 10 to 20 feet along your drop pipe, leaving some slack in between. That’s important because poly pipe is gonna stretch around one percent, so that means over a hundred foot drop it might stretch around one foot or so. So we want to make sure there’s a little extra wire slack there, and so if the poly pipe stretches we’re not pulling on our wire and we’re not pulling on our splice. If you’re installing with multiple people, you can do the taping while you’re dropping the pump down the well. One person can lower it around 10 to 20 feet and the second person can do the taping, allowing that slack in the wire. Since I’m doing it by myself, I’m going to stretch it out here. I’m going to pre-tape everything. It’s going to make it much easier to drop down the well.
While the pump and everything else is going to be hanging from our drop pipe, we do recommend installing a safety rope. This is a quarter-inch polypropylene, just basic yellow poly rope. We’re going to tie this to the top of our pump and tie it off at the top, and if our drop pipe ever breaks it’s going to give us something else to pull on in order to get the system out. If you purchase our Turnkey Kit, it’s going to come with stainless steel well seal assembly. This goes on top of your well casing and it actually holds the poly pipe which is holding all the weight of the wire and of your pump. So this is very easy to put together. Let’s take our well seal and our stainless steel nipple. I’m going to put it through the well seal and on the bottom we’ll attach our stainless steel coupler and our stainless steel hose barb.
Now you’re going to want to use Teflon tape on all of these joints and tie it all down so it’s nice and watertight. Now if you know the depth you’re going to place your pump, you can pre-cut your poly pipe to that distance and pre-attach your well seal assembly. If you’re not quite sure — or in our case, we know we’re gonna go hit the bottom and then we’re gonna raise up around five feet — I’m gonna add our well seal assembly after I’ve dropped the pump in the well. So let’s go ahead, I’m going to tape up all these joints and then I’m going to drop the pump down our well. If you’re interested, we have two detailed videos about well seals and about well casings. Check them out if you want more details about how these assemblies work and whether you should choose a well seal or a well cap for your specific application.
So we double-checked all of our connections and now we’re finally ready to start dropping our well pump down our well. Now this is doable with one person, but if you have two people, that’s even better. It allows free hands for one person to lower the pump and the other person to help feed wires, grab the pipe, just make sure everything’s going down the well casing smoothly. What you want to avoid is your drop wire rubbing or pulling tightly against the well casing as you lower it down. That can damage your wire or pull your splice loose. In general that’s not a problem. With the second set of hands you can minimize the amount of strain you’re putting on any of the wires because we want to lower it by our poly pipe and at the end everything’s going to be hanging from the poly pipe and there’s going to be no load on our wire, our rope, or any of our sensor wire.
Now I do like to use a moist towel or rag when I’m dropping it down. I feed the poly pipe and the wire through it, and that’s going to wipe up any of this dirt or debris and it’s going to keep it out of our well, keeping a nice clean water supply. So let’s go ahead, I’m going to grab this pump, and we’re going to drop it down our well 65 feet. It’s not going to take too long, it’s not going to be too heavy. It’s going to be a nice simple installation. So we’ve gone ahead, we’ve dropped our pump. It’s down at the bottom of the well. Now we don’t want to leave it at the bottom of the well. We’re going to want to raise it around five feet off the bottom — even more if you have plenty of water in your water column — and that’s going to allow any sand or silt or any other debris to settle down below your pump and so you’re not constantly sucking it up and possibly wearing out your pump or putting that into your water supply.
If you know the depth you want to pre-set the well, then go ahead and install your well seal before you drop the well pump, and then when you get to the end you know the depth and you simply set your well seal on top of your well casing. Since I know we’re at 65 feet, I went ahead, it’s down at the bottom, I’m gonna pull it up five feet, so we set it at 60 feet. I’m going to cut the poly pipe off and I’m going to install our well seal and then finish off our well here.
Now let’s talk a little bit about wire management. Most likely if it’s a very short distance you’re going to be able to get away with some flexible conduit in order to run your pump wire and your low well sensor through and up over your controller. If you’re going a longer distance, then you’re going to want to either direct burial your wires by digging a trench or install some conduit and pull your wire through the conduit over to your controller. You’re also going to want to fence off this area if there’s livestock in it. I can’t tell you how many times we get a phone call that the livestock either broke into the fencing or there wasn’t any fencing and they came in, chewed up the wires. It’s not a big deal. You’re going to have to do a little bit of repair and we can definitely get you sent out a replacement sensor if anything got damaged and you’re not able to splice it. Now everything’s hooked up. Let me go ahead, i’m going to fire up the controller and we’re going to see if everything’s working properly.
Success!
Power light turns on. Then we’re going to get our pump light, and after a few seconds we should start seeing water flowing from our well. And with the flip of a switch, we’re up and pumping water out in the middle of a field where we normally wouldn’t be able to. If you need a system, we have pump sizing specialists standing by ready to help you size your system and make sure it’s the right fit for you. We ship the systems right to your door, so all you have to do is load it in your truck, drive out on the field, and get it installed in only a couple of hours. This is Mike with RPS Solar Pumps. If you need a pump, give us a call at (888) 637-4493, or visit us at RPSolarPumps.com and put the sun to work pumping water every day for your livestock, irrigation, or any of your water needs.